Choosing the right leather can be quite frustrating, intimidating, and overwhelming when you are just getting started on leathercraft / leatherwork because you can’t decide what leather to choose, what kinds of leather there are or how thick your leather should be.
Leather is basically the skin of an animal. There are various animal leathers that you can use for your projects. However, the most common is cowhide a.k.a. cow leather. In this post, we will be explaining based on cow leather.
We will cover the following factors that would need to consider when choosing the right leather:-
1. Leather Quality
2. Leather Tanning Methods
3. Thickness of Leather
4. Leather Cuts
5. What Leather to Choose for Practicing Leathercraft as a beginner?
Jump Ahead - Table of Contents
Leather Quality
Within the same hide, there are different categories that have different qualities. Below are the 4 categories:-
- Full Grain Leather
- Top Grain Leather
- Genuine/Suede Leather
- Bonded Leather

Full Grain Leather
Full grain leather is the best quality leather. As the name suggests, it has all the natural grains intact. Basically, hair is removed from the hide and goes straight into the tanning process. It is not buffed, sanded, or corrected to remove any natural imperfections. You get all the rough spots, scars, scrapes, the toughness, and the ruggedness of the animal. You get all the original characteristics and products made with full grain leather will last for decades. Full-grain leather is strong and durable. It will age well and form a sought-after patina over time. Full grain leather is harder to work with as it is tough. In terms of price, it is the most expensive.
Full Grain Leather – Best Deal on Amazon!
Top Grain leather
Top grain leather is the second-best quality leather. The natural grain at the top has been sanded and buffed to remove imperfections and blemishes. By removing the top layer, the leather then has a more uniform finish. However, it won’t be as durable as full grain leather as the strong fibers in the hide had been sanded off. There is a finish coat on top grain leather to protect against stains which make it less breathable but more water-resistant compared to full grain leather. This refinishing process reduces the leather from developing a patina over time. Top grain leather is often thinner, more pliable, and easier to work with compared to full grain leather.
Genuine/Suede Leather
Genuine Leather is a poor quality leather. It is still real leather but they don’t last long. Typically used by low-end manufacturers. As you can see from the image above, genuine leather is made from the bottom cut of the hide which is the leftovers after the high-end products are made. Don’t get fooled by the name “genuine”, it is of the poorest quality.
Bonded Leather
Stay away from bonded leather. These are terrible. Bonded leather are not durable, easily scratch, peel, and flake. Bonded leather is a blended combination of leather scraps and some bonding material. In a sense, it is not 100% natural leather as some other material has been “bonded” together.
Leather Tanning Methods
Tanning is the process of treating skins and hides of animals to produce leather. Tanning basically stops the decaying process and changes the skin into leather. In this post, we will explain about the two most common methods which are:
- Vegetable Tanned
- Chrome Tanned
Vegetable Tanned Leather
Vegetable Tanning is the traditional way of tanning leather. This traditional method uses natural materials and tannings and may take up to 60 days or longer. Vegetable tanned leather is more sturdy and doesn’t stretch. It is long-lasting and quality leather. Suitable for belts or briefcases which will not deform over time. Vegetable tanned leather tends to develop a beautiful patina as it ages. This makes vegetable tanned more superior compared to chrome tanned leather. Vegetable tanned leather tends to have a more dark, natural, warm, earthy color.
Vegetable tanning is considered “organic” and more environmental friendly compared to chrome tanning.
Note: Vegetable tanned leather are suitable for making sheaths and holsters. Vegetable tanned leather can be wet-molded to the shape of the object. Chrome tanned leather is not suitable as the chromium salts may react with the metal.
Chrome Tanned Leather
Chrome tanning uses a solution of chemicals, acids and salts (including chromium sulphate, thus the name ‘Chrome’). The tanning process is much quicker, automated and can be completed in a day. This makes chrome tanned leather more cheaper compared to veg tanned leather.
Chrome tanned leather is more versatile when making projects. It is thinner and more stretchable compared to veg tanned leather. Tends to deteriorate with time and use compared to veg tanned leather.
Chrome tanning uses chemicals which are hazardous to the environment. Chrome tanned leather tends to have a chemical smell.
Leather thickness
This is the confusing part, in US leather thickness is measured in ounces, but in the UK it is measured in millimeters. Below is a leather thickness chart from weaver leather supply that is a good reference. It shows the ounces, millimeters, and the general application.
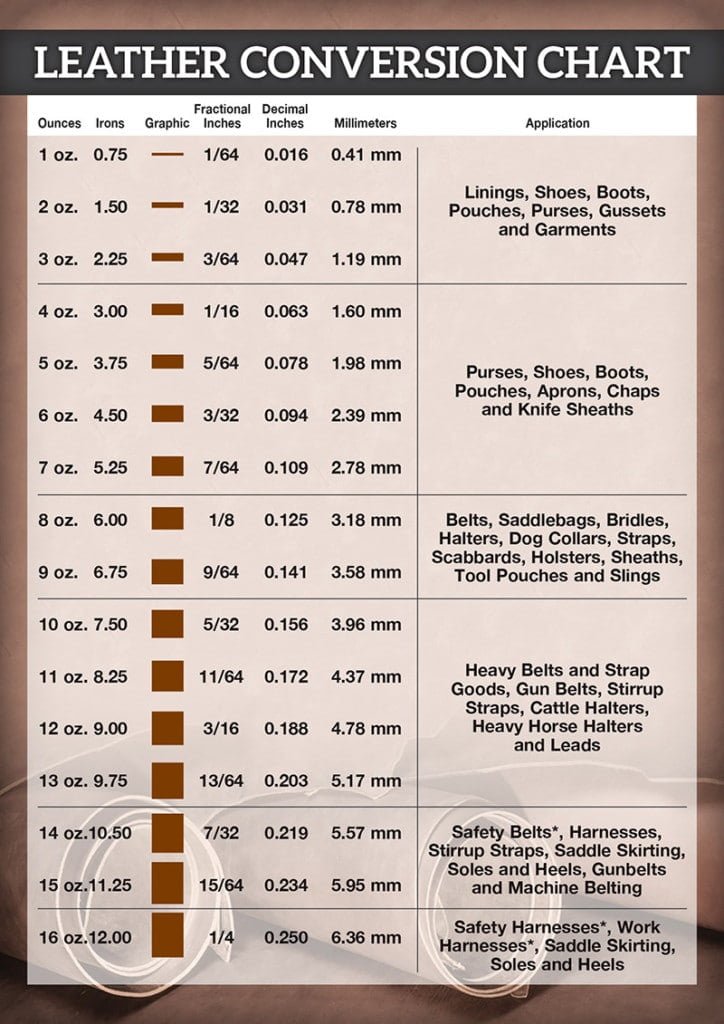
There is no fixed formula to choosing the right leather thickness. It depends on the project and style that you want to make. It takes a lot of experimenting to find out what works for you.
General guideline as below: (Depends on your style and preference)
| Application | Thickness |
|---|---|
| Wallet / Purse | 3-5 oz. |
| Journals / iPad cases / Notebook Sleeves | 4-6 oz. |
| Tote bags | 3-5 oz. |
| Briefcases / Satchels | 6-7 oz. |
| Belts / Sheaths | 8-12 oz. |
Leather Cuts
Leather are bought based on the cuts of the hide. (Except for smaller animals which are sold as a whole). Below is an illustration from Weaver Leather Supply.
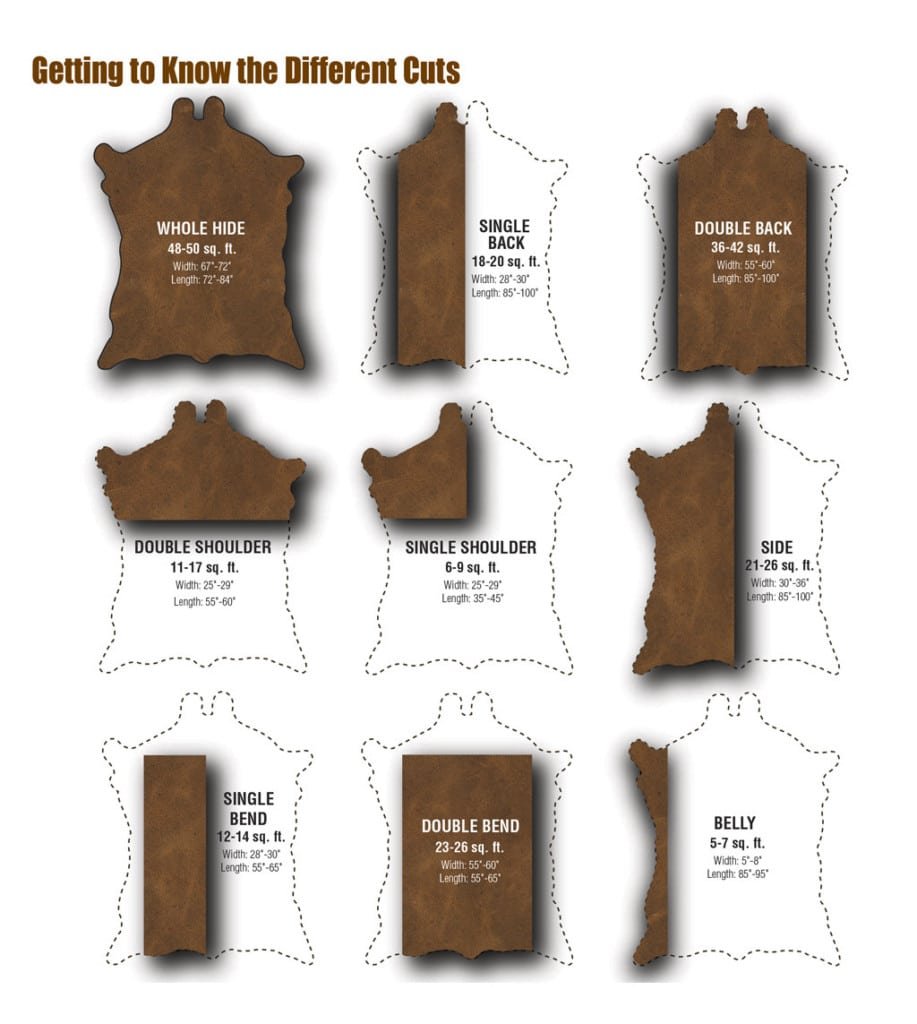
Different cuts or sections have different properties.
- Sides: This is basically half a cow. Leather ranges from softer stretchable properties to thicker firmer areas.
- Shoulder: Good quality. Not as thick as bend/butt but still stretchable. Available in single shoulder or double shoulder.
- Bend/Butt: Best quality. Thickest and firmest part of the hide. Minimal stretch
- Back: Bend/Butt + Shoulder
- Belly: Soft and stretchy. Not considered good quality. Least expensive.
What Leather to Choose for Practicing Leathercraft as a beginner?
So the golden question, what leather should I choose as a “beginner” leather? Short answer : Leather scraps.
Leather Scraps – Best Deal on Amazon!
Start off with anything cheap and work on smaller projects.
- Chrome tanned leather
- Genuine / Split leather
- Belly cuts (Least expensive)
- Leather scraps (IMHO, this is the best option). You can get scraps from your local leather shop or leathercrafters. You can get them online from leather suppliers as well.
- Used leather goods / furniture.
- Faux leather (Only for stitching or cutting practice). Never tried faux leather before but I believe you can’t skive or burnish them.
In the next chapter, we will talk about the types of leather dye used in leathercraft / leatherwork.
Leathercraft Basics – Table of Content
Chapter 1: Leathercraft Basics Introduction
Chapter 2: Understanding the Leathercraft Process
Chapter 3: Tools Needed for Leathercraft
Chapter 4: Leather Explained – Choosing The Right Leather (You are here)
Chapter 5: Leather Dye
Chapter 6: Burnishing Agents
Chapter 7: Adhesive / Glue
Chapter 8: Leather Finishes
Chapter 9: Leathercraft Techniques (Coming Soon)
Chapter 10: Machinery used in Leathercraft (Coming Soon)
